Batt Insulation in Virginia Beach: What’s Actually in Your Walls?

Most homes in Virginia Beach have batt insulation. The pink or yellow stuff crammed between the studs. Built in the 70s, 80s, 90s, doesn’t matter, it’s probably in there. Problem is, a lot of it has been sitting there for decades doing less and less. Before you assume yours is fine, take a look at this: Batt Insulation Virginia Beach.

Quick rundown on what batts are

Pre-cut panels. Mostly fiberglass, sometimes mineral wool. You fit them between wall studs or floor joists and that’s basically it.

Fiberglass batts come faced or unfaced. Faced means there’s kraft paper on one side that acts as a vapor retarder. Goes against the interior wall to slow moisture moving through. Unfaced is just the insulation itself.

Mineral wool is the denser option. Handles fire better. Doesn’t absorb water, which matters out here near the water.

The R-value piece

Virginia attics should be hitting R-49 to R-60 per DOE recommendations. Fiberglass batts run R-3.1 to R-4.3 per inch. Mineral wool is close to that.

A 2×6 wall cavity gets you to about R-21 with batts. That’s acceptable for walls. Attics need a lot more, so you’re either stacking layers or mixing with blown-in to reach the target.

Where batts work and where they don’t

Open cavities during construction or a gut renovation. That’s their sweet spot. You can see exactly what you’re doing, fit them properly, get the performance the label promises.

Closed walls are a different story. Can’t really retrofit batts once drywall is up. That’s when you switch to blown-in. And even in open cavities, a sloppy install wrecks the R-value. Gaps, compression, wrong size for the cavity. Any of those and you’re not getting what you paid for.

Humidity and what it does to fiberglass

Fiberglass doesn’t soak up moisture itself. But moisture moves through it. In a humid climate like coastal Virginia, that can create conditions for mold inside the wall cavity if the vapor barrier isn’t set up right.

Mineral wool is more forgiving. Water-repellent by nature. Gets damp, dries out, keeps its R-value. For homes close to the water around 23451 or Chic’s Beach, that difference is worth paying attention to.

Bottom line

New build or big renovation with open walls? Batts make sense. Older closed-wall home trying to improve performance? Probably looking at blown-in for most of it. Either way, knowing what’s already in there before you spend money is the right first step.

When the Tree Crew Shows Up with a Crane

Crane-assisted tree removal lifting a storm-damaged tree off a garage

If a tree company tells you your job needs a crane, your first reaction is probably sticker shock. Maybe a little skepticism too. Is that actually necessary, or are they just padding the ticket?

The honest answer: sometimes it’s genuinely the only safe way to do the job. Sometimes it isn’t. Knowing the difference is worth a few minutes of your time.

Why a Crane Enters the Picture at All

Standard tree removal works on the assumption that sections can be dropped or lowered into open space nearby. A climber goes up, cuts in sections from the top down, pieces land in the yard, chipper eats the brush. Clean and predictable.

That method breaks down when there’s nowhere for the pieces to go. A big tree jammed between a house and a fence with utility lines on the other side has zero good drop zones. A crane solves that by lifting sections straight up and swinging them to wherever there’s clear ground.

The other situation where cranes show up: when the tree is in bad enough shape that sending a climber up isn’t safe. Internal decay isn’t always visible. A tree that looks solid can have compromised wood at its core, and a climber putting weight on a branch that fails without warning is a serious problem. From the ground with a crane, nobody’s in the tree when it’s cut.

Storm Damage and Trees on Structures

This is the scenario most homeowners actually run into. A tree comes down in a storm and it’s not sitting in the open yard. It’s on the house, the garage, a parked car. Now what?

Here’s the problem with just cutting it from the bottom up: everything above the cut still has to go somewhere. If there’s a roof under the tree, the pieces don’t have a good place to land. You end up making the structural damage worse than the original impact. A crane holds each section before the cut happens. When the saw goes through, the crane’s already got it. That section gets lowered to clear ground instead of dropped onto whatever’s below.

It’s slower and it takes more coordination, but on a job like that, the control is the whole point. You can find more on crane-assisted tree removal through Tree On Me’s site. For a broader look at what they handle in the area, tree removal services in Montgomery County covers the full picture.

It Takes More Space and More Lead Time

A crane is a big piece of equipment and it needs somewhere to stand. Usually that means a driveway or a section of open yard wide enough to position and stabilize the rig. If the access is limited, that complicates things. The crew may need to clear the area first before the crane can even get set up.

Budget more time for these jobs overall. The planning involved is different from a standard removal, and if the company is coordinating with a crane operator they don’t have on staff, scheduling can take a few extra days.

What to Ask When a Contractor Recommends It

Don’t just take the recommendation at face value. Ask them to walk you through why your specific tree, in your specific yard, can’t come down the standard way. What’s the drop zone problem? Is the canopy compromised? Is it the structure underneath?

A contractor who knows what they’re doing will have a clear answer. If the explanation is vague or they pivot quickly to talking about price, that’s your cue to get a second opinion before committing.

Also find out whether they own the crane or whether they’re subbing it out. Both are workable. You just want to know who’s actually operating the equipment and whether that person does this regularly.

Crane Jobs Cost More. Get the Site Seen First.

There’s no way around the cost question, so let’s be direct: crane removal runs more than standard removal. More equipment, more labor, more coordination. The range is wide because it depends on the tree, the site, and the complexity of the lift.

Anyone who gives you a confident number over the phone without visiting the property is just guessing. Get someone out to look at the actual job before you agree to anything. And if something about the recommendation doesn’t sit right with you, a second opinion is always a reasonable thing to ask for.

Your Energy Bills Are High. Could Leaky Ducts Be the Reason?

duct repair in Glenview for leaky attic ductwork

If your energy bills seem higher than they should be, there’s a common culprit that doesn’t get enough attention: leaky ductwork.

Most homeowners never think about their ducts. They’re hidden in walls and ceilings, out of sight and out of mind. But when ducts develop leaks, gaps, or disconnected sections, a significant portion of your conditioned air — air your system worked to heat or cool — escapes before it ever reaches the rooms in your home.

How Big Is the Problem?

The U.S. Department of Energy has studied this extensively. In many homes, leaky ducts are responsible for 20 to 30 percent of heating and cooling energy loss. That means for every dollar you spend on energy, up to 30 cents is paying to heat or cool your attic, crawl space, or the inside of your walls.

Signs Your Ducts Might Be Leaking

You don’t need special equipment to notice the symptoms:

  • Some rooms never seem to reach the temperature on the thermostat
  • Energy bills have crept up without an obvious explanation
  • There’s more dust than usual on surfaces throughout the home
  • You can hear whistling or unusual sounds from the vents
  • Airflow from some registers feels weak or inconsistent

Any of these on their own could have another cause. Multiple symptoms together often point to the duct system.

What Repair Involves

Duct repair starts with a diagnostic — often a pressure test — to measure how much air is escaping and locate where the losses are happening. From there, technicians seal gaps and leaks, repair or replace damaged sections, and test airflow to confirm the work improved performance.

If you’re in the Chicago suburbs and want to find out whether your ducts are costing you money, click here to learn about professional duct and vent repair services in Glenview.

The Payoff

Sealed ducts mean lower energy bills, better comfort in every room, and less strain on your HVAC equipment. For many homeowners, duct repair pays for itself within a few years — sometimes faster.

Solar Panels and Your Roof: What Nobody Tells You

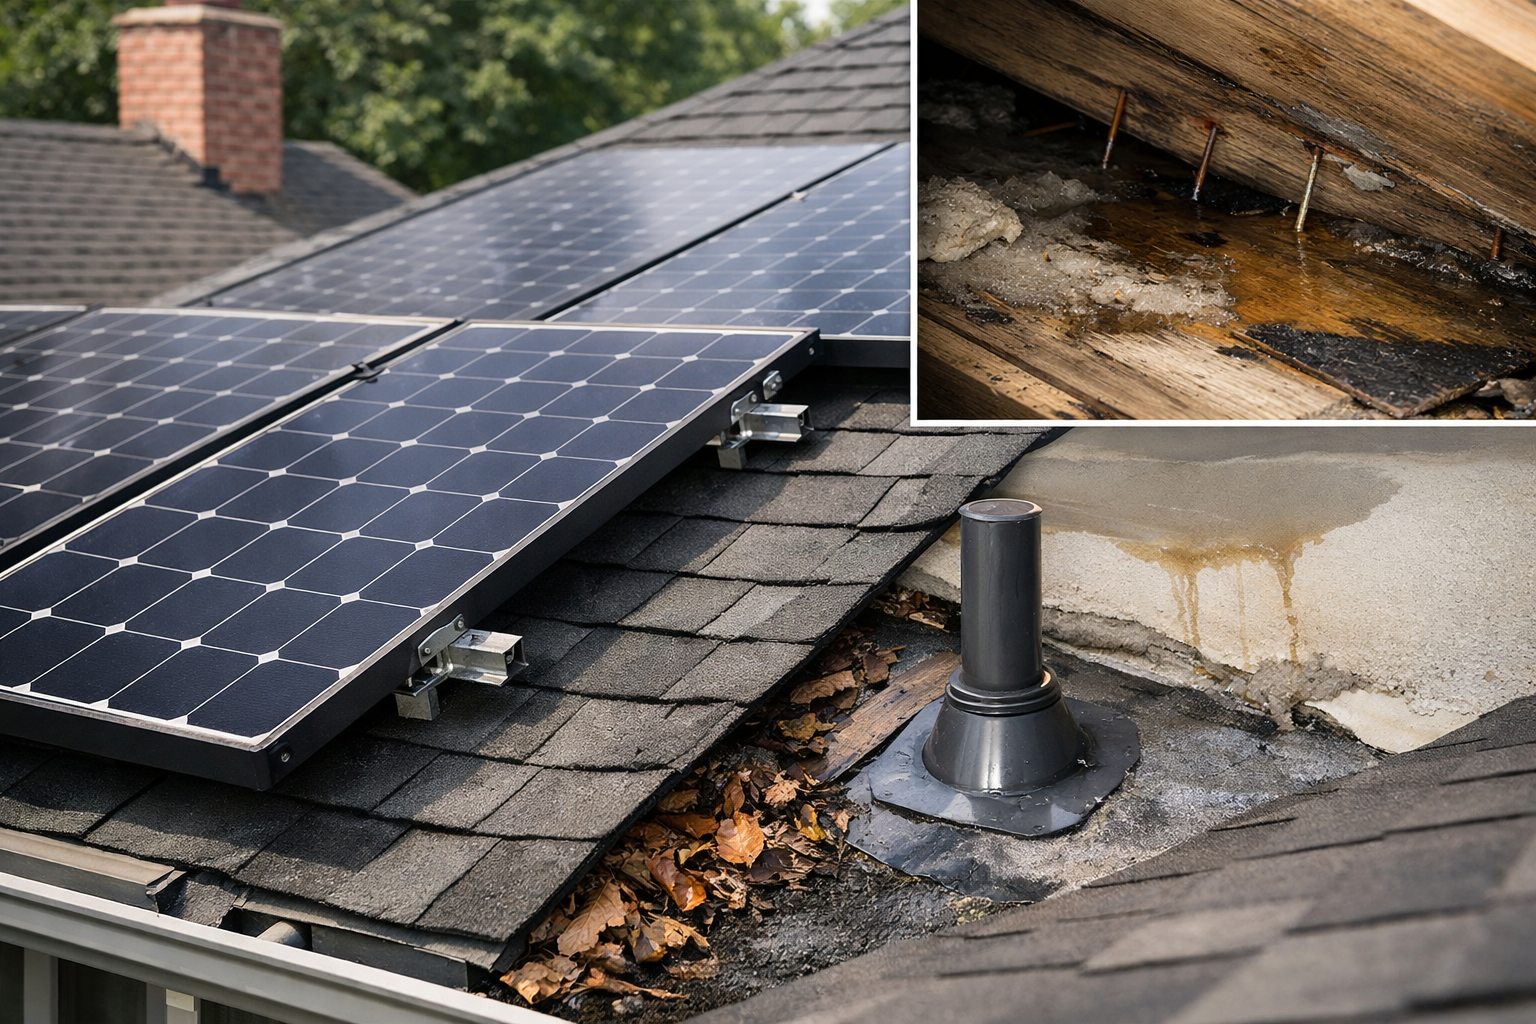
Solar panels on a shingle roof with vent flashing stains and attic water damage.

The first clue something’s wrong usually isn’t a panel issue—it’s that damp “wet drywall” smell in a closet a day or two after a hard rain. Solar can be installed perfectly and still expose a roof detail that was already on the edge, and the water won’t always show up anywhere near the panels.

The roof doesn’t just “hold panels” — it becomes part of the system

Once solar goes on, your roof becomes a platform with penetrations, metal hardware, and mount points that move a little with heat, cold, and wind. Most installs are solid, but one small miss—like a lag that didn’t bite into framing or flashing that isn’t seated flat—can turn into a slow leak that takes time to show up indoors.

Water also travels. It can enter at one mount and drip somewhere else entirely, which is why a stain “away from the panels” doesn’t rule anything out.

Panels shade shingles too. That’s not automatically bad, but it can mean the shingles under the array age differently than the shingles around it.

If your roof isn’t ready, solar makes replacement harder (and more expensive)

The easiest time to handle roof work is before panels go on. A practical rule of thumb: if you can’t honestly see your roof lasting another 10 years, think hard about replacing it first.

Why? Because a reroof with solar usually means a remove-and-reset, new flashing work at mounts, and more coordination than you expect. Even when it’s straightforward, you’re paying for extra steps that didn’t have to happen.

Nobody likes hearing this, but the cheapest reroof is usually the one you do before you trap the roof under an array.

If you’re trying to judge roof life quickly, don’t rely on a driveway glance. After a steady rain, give yourself 10 minutes in the attic within the next 24–48 hours. Look for dark streaks on the underside of the deck, damp-looking wood near penetrations, or nail tips that look freshly rusted.

If your roof is already 12–15 years old, don’t just ask “can it last?”—ask what happens if it doesn’t. Also ask, up front, who is responsible for water-tightness around the mounts after everything is back in place. If you want a plain-language overview of how roof repair or replacement is typically handled when panels are in the mix, GRM Roofing NJ walks through the common options. Read it like a checklist. Then have your installer and roofer confirm—on paper—what they’ll do if a leak shows up later.

The details that matter most are boring: mounts, flashing, and layout

Most solar-related roof problems are water-management problems.

Mounts should be anchored into solid structure, not just sheathing. If a mount loosens even slightly, you get movement, and movement is what defeats seals.

Flashing matters more than sealant. Sealants dry out in sun and temperature swings; flashing is physical water-shedding that keeps working as materials expand and contract. I’ve seen water follow a rafter bay and show up 10–15 feet away from the actual entry point.

Layout affects maintenance. If panels are packed tight against an edge or crowded around vents, it’s harder to inspect the roof features that usually fail first. Even a modest clearance buffer—roughly 6–12 inches around plumbing vents and flashings—makes future checks and repairs far less frustrating.

Ask for photos during the install.

A few close-ups of mounts and flashing before panels go down can save a lot of guessing later.

After solar is installed, your maintenance routine should change a little

You don’t need to obsess over your roof, but you should switch to a simple cadence. Two checks a year is enough for most homes: one in early spring and one in late fall. Add a quick extra look after any storm with strong gusts, hail, or heavy branch debris.

After big rain, do an indoor sweep first. Check top-floor ceilings, closet corners, and around bathroom fans and skylights. Watch for bubbling paint, a soft drywall spot, or a faint ring that looks like it was traced lightly in pencil.

After wind, stand back and scan the roofline with your phone zoom. You’re not judging the solar hardware from the yard; you’re looking for roof clues around the array: lifted shingle edges at the perimeter, bent flashing, or debris piled in valleys. If you keep seeing leaves trapped behind the lower edge of the panels, that “leaf dam” holds moisture longer after rain and can speed up wear right where you can’t easily see it.

If you’re tempted to climb up, make safety the priority—wet surfaces and gusty conditions are a bad combo. This federal ladder safety guidance is boring, but it’s worth skimming before you decide a “quick look” is no big deal. Ladder safety guidance

Wind-driven rain is another sneaky one, because it pushes water sideways into seams that normal rain rarely tests. This wind and water infiltration guidance is a solid explanation of how water finds paths you wouldn’t expect (which is the same “why is the leak over there?” problem people run into after solar). Wind and water infiltration guidance

And if you ever need roof work under or near the array, treat it like a coordination job, not a “quick patch.” A good plan focuses on preserving flashing integrity and limiting movement at penetrations, not just adding more sealant and hoping for the best.

Takeaway

Solar is great, but it changes how your roof behaves and how problems show up. Time the roof work smartly, insist on real water-shedding details, and keep a simple inspection rhythm so small issues don’t turn into expensive surprises.


5 Reasons to Pay for Asphalt Parking Lot Maintenance

If you believe a tiny crack or pothole in your asphalt parking lot is a big concern, think again. Small asphalt cracks and potholes can become larger and cost more to fix, and they can also increase your responsibility as a company owner. Here are 5 justifications for hiring a parking lot maintenance company. 

1. Prevent lawsuits

If you operate a commercial facility, you must maintain your parking lot properly to prevent facing legal action. You will be held liable if your parking lot has significant cracks and potholes that cause a customer’s car damage or personal injury. 

You are in charge of keeping your parking lot secure and functional for clients. You should contact an asphalt paving contractor to fix any potholes in the asphalt.

2. Stop cracks and potholes

Did you know that as temps change, asphalt will expand and contract? Parking lot crack repairs may become necessary if you don’t make the necessary investments in asphalt parking lot maintenance. 

Asphalt potholes are more prone to occur in parking lots that have structural cracks over time. Cracks and potholes might lessen the number of parking spaces that are actually useable in the lot in addition to being an eyesore.

Read more about the need for pothole repairs in your asphalt parking lot here.

3. Avoid Expensive Repairs

Small parking lot repairs are less expensive than having to replace your parking lot before it is necessary. Your asphalt surface won’t deteriorate over time if you make an investment in parking lot maintenance. 

If a new parking lot can be avoided, nobody wants to foot the bill. There is no reason your parking lot shouldn’t survive up to 20 years if you take good care of it.

4. Bring in more customers

A dilapidated parking lot is the single biggest item that may take away from the curb appeal of your commercial building. Focus on making a strong first impression as soon as they pull into the lot if the success of your company hinges on your ability to attract new customers or promote recurring business. 

If customers are unable to locate a parking space that is useable because of potholes, they will grow irate. Additionally, prospective customers can infer from the state of the parking lot that your company operates in general.

5. Property Value Growth

You should enhance the appearance of your asphalt parking lot if you intend to sell your commercial property soon. Large cracks and potholes won’t attract potential buyers because they will judge the property as soon as they come into the parking lot. 

After purchasing a home, buyers do not want to immediately pay for the replacement of the asphalt parking lot. In other words, severe parking lot damage lowers the value of your home and makes it more challenging to sell.

Dial Now!

The team at Hackensack Paving puts a lot of effort into assisting owners of business buildings with asphalt parking lot maintenance. Call our Hackensack asphalt repair professionals at 201-514-6060 if you’re interested in our service for repairing asphalt parking lots.

Why Pavement Sealer Wears Off Asphalt Faster In Parts Of NJ.

I frequently have meetings with potential clients for property management in New Jersey to talk about pavement seal coating. The seal coating applications in this market do not last as long as they do in other markets where they manage properties, which is one of their main complaints. Their grievance is not without merit. Actually, that is entirely accurate.

“The Rock is everything,”

We must first look at the sort of stone used in the asphalt to understand why pavement sealers do not last as long in this market as they do in other nearby places. There are no aggregate quarries in southern New Jersey that are utilized to make hot mix asphalt. Rich sand deposits can be found in a variety of “sand pits” or simply “pits” in southern New Jersey (as they are referred to). From sewage sand to the real sand used as mineral filler in hot mix asphalt, these sand pits are dredged for high-quality sands. Because of this, quarries in eastern Pennsylvania have historically trucked the aggregate (also known as a rock) needed to produce hot mix asphalt into this area.

An argillite aggregate is used in several asphalt factories in New Jersey. New Jersey has a number of sizable argillite stone resources that are mined, processed, and then trucked to asphalt manufacturing facilities nearby.

Since I am not a geologist, I cannot explain why the argillite aggregate appears to oxidize more quickly than the conventional granite stone used to produce asphalt in other regions of New Jersey.

It is quite impossible to get pavement sealer to adhere to argillite once it starts to oxidize (become gray).

I was able to land a sizable national account as a client in my first year of operation. They assigned me a property in Voorhees, New Jersey, as their first project. The parking lot was only a few years old when I went to the project to execute the seal coating estimate, but the asphalt was quite smooth and gray. When I called my supplier, Neyra Industries, for advice, they suggested using a penetrating primer before seal coating.

The seal coating treatment lasted over five years since I followed their advice.

When applying a sealcoat, timing is crucial.

Generally, bonding problems with pavement sealer are avoided if it is applied within 18 months of the installation of the asphalt. The asphalt binder is still covering a lot of the aggregate over the first 18 months. You will experience bonding problems getting the pavement sealer to adhere in high-traffic areas, though, as the asphalt starts to exhibit signs of “graying out.”

Pavement priming: What Is It?

Application of a penetrating primer, such as Southern Emulsions Tarloc MPC, Maintenance Inc. Oxi-Bond, or Neyra Poly Prime, is known as “paving priming.” The primer works as a bonding medium to thoroughly and cohesively bind the pavement sealer to the asphalt by penetrating down into the asphalt.

What Takes Place When Seal Coating Oxidized Asphalt Without Applying A Primer?

Simply said, the pavement sealer will disappear from high-traffic areas in less than a year. The South Jersey pavement seal coating project seen in the photographs below was improperly primed before seal coating, which caused the pavement sealer to wear off in less than a year.

Does Every Parking Lot Need Priming For The Pavement Sealer To Last 3 Years In This Area?

No. Although it will aid in establishing a stronger bond between the pavement sealer and the asphalt, priming is not necessary for all seal coating operations. While most asphalt plants in the area use argillite, some of them use granite stone. Compared to argillite, granite stone oxidizes, but considerably more slowly. The images below show two different aggregate kinds being used to build asphalt. It would be necessary to prime the white and oxidized asphalt in order for the pavement sealer to adhere correctly.

7 Ways to Check for Water Damage in Your Stucco Home

  1. Damp-Looking Stucco – It shouldn’t be concerning if the stucco sometimes gets damp. The fact that it’s wet will make sense when it has rained. It nonetheless indicates that water has penetrated the stucco if it is still damp a week after the rainy weather. There might be areas of the wall that constantly seem moist. Pay special attention to them since water may be entering there.
  2. Cracks – An obvious indication that there is water in your stucco is a crack in it. Though it doesn’t necessarily mean that you have sustained permanent harm, you shouldn’t panic. You must act right away to prevent things from getting worse because it is a sign that water has entered the building.
  3. Missing Chunks of Stucco – Examine your stucco to check for any siding pieces that may have peeled off. Surface damage indicates that water has seeped underneath and is causing issues.
  4. Cracks and Bubbles at the Bottom of the Wall- Check the bottom edges for any obvious cracks or bubbles during your inspection. Water must follow gravity’s laws, just like everything else, or it will fall. Therefore, the majority of the damage may be located at the wall’s base.
  5. Window Caulking Damage – Do you see any cracks or holes in your window caulking?   Additionally, it indicates that water has penetrated the stucco. You will also need to replace those windows if it has been there for a significant amount of time. Regular stucco inspections are crucial because of this.
  6.  Soft Drywall – You’re heading inside to carry out your probe. Examine the drywall below your windows. When you touch it, does it feel soft? Another clear indication of water damage is that. In these situations, the outside stucco and that part of the drywall will need to be replaced.
  7.  Basement Moisture- And lastly, check the walls in your basement. You’ll observe that if the stucco contains water, it may result in moisture on the walls. However, since there are other potential causes, you should eliminate them before fixing the issue.

Beginner’s Guide to Radiator Placement

Are you getting ready to buy a new radiator? Well, it does matter where you put your new radiator. If you put it in the wrong place, you’ll end up with a heating system that doesn’t work well and will cost you a lot of money over time.

Want to know everything there is to know about where to put radiators? In this article, we’ll talk about where you should and shouldn’t put your radiator so you can get the most out of it.

What You Need to Know About Putting in a Radiator

You don’t know where to put your radiator. Here are some general tips and warnings about radiators to help you make the best choice.

Put a window under your radiator.

Do cold drafts often come into your house? If that’s the case, you might want to put your radiator under a window. This will stop any cold air from coming in through the window and spread the heat evenly throughout the room.

This placement works best if you live in a house with single-glazed windows, which let in cold drafts more easily. If you have better insulation and double-paned windows, you might not need this placement.

Place your radiator on a wall that faces north.

Did you know that walls that face north usually get less sun and are therefore colder? Because of this, you might want to put your radiator on the inside of a wall like this. This will stop cold air from moving around the room, and it will work better than putting a wall on the east side of the room, which is already warm from the sun.

Don’t put furniture near your radiator.

If you don’t like the way a radiator looks, you might be tempted to try to hide it behind a sofa or other piece of furniture. This will only stop your radiator from working at its best and spreading heat. Doing this could also trick the thermostat in your room into thinking that the room is at the right temperature, which would cause it to turn off, which would be useless.

You also shouldn’t put a radiator cabinet behind your radiator. This may seem like a good idea, but in the end, it will block a lot of heat, which will cost you more money and give you less heat.

There are many sleek and modern radiators on the market today, so if you don’t like the one you’re looking at, keep looking until you find one that fits your space.

Don’t put your curtains near your radiator.

Not putting your radiator next to your curtains is another important thing to avoid. If you do this, you will end up pushing out the window instead of into the room, and the radiator’s power will be used up.

If the radiator shorts out next to the curtains, you could have safety problems.

Final Thoughts on Where to Put the Radiator

When it comes to heating your home, where you put your radiators makes all the difference in how much heat and energy you use. By following the tips and tricks in this article about where to put your radiator, you can find the best spot for it.

No matter where you put your radiator, you need to make sure it gets regular maintenance to make sure everything is working right. Here are some tips for taking care of your radiator.

Why You Should Get Help From Expert Cleaners Before Your Move

Moving is a laborious and time-consuming process that may quickly become daunting. Additionally, there is the added stress of maintaining order. Hiring a cleaning service to clean your old or new house may be beneficial. It is more crucial and necessary than you realize and helps reduce some of the moving stress.

Reduces Anxiety Related to Moving

Feeling stressed and overwhelmed by the number of tasks on your to-do list is expected. According to a survey, moving is the most stressful experience in most people’s lives. Consider hiring a cleaning service to reduce some moving-related stress. You may rest confident that everything will be taken care of for you.

Helps You Save Time

A thorough cleaning can take an eternity; the last thing you need before your big move is more duties. To maximize your time, hire a cleaning service to handle this task. Prioritize hiring movers, changing your address, meticulously packing your items, and doing everything else on your moving to-do list to make your moving deadline.

Have a Sparkling New Home

You do not know how thoroughly the previous tenants cleaned the property until you moved in. When you engage a maid service, you can rest assured that your home will be thoroughly cleaned. They can clean and disinfect every surface in the house, which is perfect for allergy and asthma sufferers. It will allow you to begin your new life in a clean and healthy atmosphere.

Why You Need Professional Cleaning

Professional cleaners do a thorough cleaning as part of a comprehensive cleaning service. The majority of us are not precisely cleaning gurus. We may be unable to effectively clean various surfaces or eliminate the most stubborn stains and filth. A professional cleaning service is the most effective technique to guarantee that your home is always clean.

It’s Only Done Once

Employing a moving cleaning service will allow you to clean your entire property effortlessly. Try out local maid services to determine the standard of work in your new community. It will enable you to evaluate the cleaning service’s quality and determine whether or not to continue working with them.

Offers a Range of Cleaning Options

Before you move in, you anticipate a comprehensive cleaning of your new home, using all essential tools and equipment. There is a possibility that you may not possess the necessary time and skills to accomplish the work. Therefore, it is strongly suggested that you hire experienced movers to do the cleaning before your arrival. They will utilize superior methods and tools to clean your home thoroughly and securely. Typically, professional cleaning services cater to a variety of needs.

General Maintenance

Bathroom and bedroom cleaning requests are the most prevalent. It involves sweeping, mopping, dusting, and cleaning the floors, counters, and fixtures in the kitchen and bathroom.

Kitchen Cleaning

This includes cleaning the stovetop as well as the remainder of the kitchen. Also included are mopping, cleaning, and washing the floors. Additionally, the professionals can disinfect the refrigerator and clean the interior and exterior of the cabinets to verify that they are safe for food storage.

Window Washing

Some maid services may clean walls, light switches, and baseboards as part of their standard service. However, it may be helpful for some individuals. Maintain clean windows to enhance the interior and exterior appearance of your property. This is crucial when choosing a move-in cleaning service for your residence.

Appliance Cleaning

Numerous businesses give cleaning supplies as part of their standard service. You can request this functionality as an optional extra if they do not currently offer it.

Cleaning Difficulties When Vacating a Rental

When renting a home, hiring a professional cleaning service enhances the likelihood that your security deposit will be returned. If you leave your former landlord’s property in good shape and ask to use them as a reference when you move out, you will have a better chance of getting a great deal on your next apartment or house.

Before renting out your present home, you should use a professional cleaning firm to perform a complete cleaning. A clean residence attracts a large number of qualified tenants.

Conclusion

Cleaning should always be at the top of your to-do list, but when you’re in the middle of a move, it’s easy to forget. Hiring a professional cleaning service is vital for a stress-free and enjoyable move. JP Salt Lake City Commercial Cleaning has been in business for over 25 years and provides facility maintenance and complete commercial cleaning services.

We promise to employ the most effective and efficient cleaning procedures currently available. Relocating can be challenging, but not with JP’s aid. Our staff has received thorough training to offer you the highest quality service possible. Please visit our website or contact us immediately for additional information.

Traditional or Modern Design? Can’t Decide? Then Transitional Style is for You!

Are you considering a new home or a large makeover but can’t decide on a style? Is it a toss-up between a traditional style of comfortable furniture and classic designs and a modern style of sleek, clean lines? You’ll be pleased to find that you may have them both in the popular transitional design.

The eloquent luxury transitional design allows you to choose your preferred aspects from both traditional and modern styles, resulting in a perfect synthesis that is comfy, classic, and chic.

When expertly implemented, one of the key advantages of designing a custom transitional home is the opportunity to select your favorite components from each type without losing the aesthetic, worth, or quality of the finished product.

So, how do you go about doing this, and what factors should you consider?

To begin, below are simple definitions of traditional and modern style.

The traditional style is a design and architectural style that is based on the classic styles of old Europe. Crown molding, wainscot, chair rail, vaulted ceilings, and natural materials like wood are used.

Modern style is all about simplicity, clean-sleek lines, tapering legs, and precise angles to create an open, airy vibe. It relies on man-made components such as glass, metal, and concrete.

The transitional design is a hybrid that invites the soft lines and cozy furniture of the classic style without the hassle while maintaining the color palettes and slick modern styling.

Here are some factors to consider when developing your transitional style:

1. Stick to a neutral color scheme of grey, sand, or white, but try adding some strong accessories to create contrast.

2. Don’t go overboard with the ornate woodwork. Avoid elaborate crown molding or wainscot in line with the modern aesthetic. Keep it simple.

3. Transitional fashion Lighting utilizes modern lighting and is an interesting way to transform your home. Lighting can have a wonderful effect on a room, and fixtures are growing more popular as the possibilities expand. As an eye-catching focal piece, select an inspired contemporary chandelier or molecular light.

4. Metallic accents are popular in today’s current transitional style since they blend nicely with any design style. Incorporate gold, bronze, or copper into faucets, lights, side tables, and accessories. Check out our blog, The Art of Mixing Metals in Your Home.

5. Adding carpet for texture is an important aspect of transitional design. They serve to anchor the furniture in the room, add color, and provide plush luxury underfoot. Traditional woven or knotted carpets can offer texture and pattern, and neutral colors are chosen to complement the design.

6. Modern art can also be used to transition from conventional to transitional. Accents in a transitional style home can transform the decor from modern to classic. Choose your favorite contemporary artwork to create a dramatic focal point. To avoid overdoing the look, keep it simple.

Watch our most recent video, How To Get Started On Designing Your Home, for more in-depth assistance.

Our advice… Have some fun with your creativity!!

Jersey City Remodelers, a family-owned business formed in 2006, is a design-build firm that specializes in high-end remodels, house additions, and bespoke residences. With our headquarters in Jersey City, NJ, we serve clients. We are an award-winning member of the National Association of the Remodeling Industry and have an A+ rating with the Better Business Bureau.

Creative Commons Attribution: Permission is permitted to re-post this article in its entirety with attribution to Jersey City Remodelers and a clickable link back to this page.